
 |
| Lazy Daisy Stitch |
1. Bring the needle up through the center point if you are stitching a flower, and up just next to a vine or flower for leaves (fig. 1).
2. Reinsert the needle back down into the initial hole. In the same stitch, come up through the wrong side of your fabric approximately 1/8 to 3/8 inch (3mm to 1 cm) above the initial piercing (fig. 2). Wrap the ribbon behind the needle and pull the ribbon through keeping the ribbon from twisting (fig. 3).
3. Insert the needle straight into the same hole or very close to the same hole at the top of the loop (fig. 4). Notice that the needle goes down underneath the ribbon loop (side view fig. 4). The top view of figure 4 shows that the stitch is straight and will anchor the ribbon loop in place.
 |
| No-Fail French Knot |
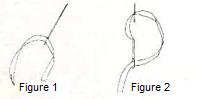
1. Bring the needle up through the fabric (fig. 1).
2. Hold the needle horizontally with one hand and wrap the ribbon around the needle with the other hand (fig. 2). If you are using a single strand of floss, one or two wraps will create a small knot. If you are making French knots with 1/16-inch (2mm) silk ribbon, the knot will be larger. The size of the knot varies with the number of strands of floss or the width of the silk ribbon being used.
3. While holding the tail of the ribbon to prevent it from unwinding off the needle, bring the needle up into a vertical position and insert it into the fabric just slightly beside where the needle came out of the fabric (fig. 3). Pull the ribbon or floss gently through the fabric while holding the tail with the other hand.
 |
| Satin Stitch |
1. To guide your stitching, first lightly trace off the area to be filled directly on the project/fabric so you have two defined lines to follow. This step aids in maintaining the varying stitch widths as they fill the shape. Secure your fabric in an embroidery hoop.
2. Begin at one end and work the needle from one side to the other, stacking up the thread just below and next to the previous stitch (fig. 1). Continue this wrapping process, keeping the fabric secured and taut while the stitches are pulled with light tension so that the fabric will not tunnel.
Heirloom Quilts includes tutorials for a variety of other quilting and heirloom techniques, as well as patterns for two beautiful quilts, the Pink Tulip Quilt and the Blue Linen Quilt.
Sew On, Sew Well, Sew Beautiful,
Cyndi and Amelia
Pretty Awesome
ReplyDelete