Showing posts with label home decor. Show all posts

Monday, October 14, 2013

Create Stuffed Sewing Stash Pumpkins

Our finished pumpkins!
With Halloween and Thanksgiving quickly approaching, it's prime time to decorate your home with lots of fun seasonal décor. These whimsical stuffed pumpkins are impressive to look at, easy to assemble and the possibilities for embellishment are endless!

Created by our design manager Leighann Lott, these pumpkins first appeared in our September/October 2009 edition and can be used in your home year after year. Each sample pumpkin pictured here has been dressed in detail using wooden spools, ribbon, miniature buttons and floral wire, while the largest pumpkin is machine embroidered with a design from Mary's Graduation Dress Designs CD, available in our online store. 

When you're finished creating your pumpkins, set them on a table alone or group them together to create a stunning, sewing-inspired centerpiece for fall.

What you need:
• Fabric and ribbon scraps
• Needle and heavy-duty thread
• Polyester stuffing
• Wooden spools
• Permanent marker, paint or stain
• Silk or fabric leaves
• Floral wire
• Craft glue
• Tracing pen or pencil
• Buttons (optional)
• Rice or dried beans (optional)
• Embroidery thread (optional)

Instructions:
Cut - Trace a circle onto fabric and cut. Varying circle size will give you different sized finished pumpkins (photo 1).


Photo 1

Stitch - Fold fabric edge 1/4 inch and sew a running stitch using heavy-duty thread (just like a large yo-yo). Gently gather fabric as you stitch (photo 2). You will create a loose ball with a hole in the center.


Photo 2

Stuff - Fill pumpkin shell with polyester stuffing. TIP: Adding rice or beans first will add weight to the bottom. Pull thread and gather fabric until opening is approximate diameter of wooden spool. Tie off thread (photo 3).


Photo 3

Create Pumpkin Sections - Anchor thread or embroidery floss near opening and wrap thread around entire ball of fabric to opposite side of hole. Insert needle into fabric to anchor and pull thread slightly to form a groove in pumpkin. Take a couple of stitches to secure. Stitch through gathered edge to begin next section and repeat to form another groove. Repeat steps to form six or eight puffed sections. Tie off thread (photo 4).


Photo 4

Stem - Paint or stain wooden spool(s). Wrap spool using ribbon scraps and put a small amount of glue on end to secure. TIP: Glue buttons to spool top to decorate. Glue two spools together to make a longer stem if desired.

Ribbon Stem Cap - Cut a length of ribbon the same diameter as fabric circle used to make pumpkin body. Sew a running stitch along one long edge of ribbon. Gather gently as you stitch. When you reach opposite end of ribbon, pull thread to form a ruffled circle of ribbon that will fit closely around stem. Keeping center opening the  size needed to fit over spool, put right sides of ribbon ends together and continue running stitch along short edge to join ribbon ends together. Tie off thread (photo 5).

Photo 5
Assemble - Position stem cap over opening in pumpkin (photo 6). Insert stem through stem cap into opening. If opening is too large and loose, make a couple of stitches and pull to cinch in opening snuggly to stem.

Photo 6
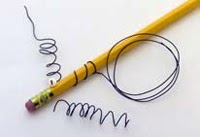
Finishing Touches - Glue silk or fabric leaves in place around spool stem. Curl varying lengths of floral wire around pencil to resemble tendrils of a pumpkin (photo 7). Place in opening between leaves and spool stem (photo 8). If necessary, secure with glue.

Photo 7
Photo 8
More great ideas:
• Use unconventional colors like moss green, off-white and autumn colors.
• Add a bit of texture to enhance your pumpkin sections by adding embroidery to your fabric before cutting your circles.
• Hand embroider a Jack-o-lantern face on one side.
• Apply beads for a touch of sparkle.
• Add small buttons at the end of the tendril for a touch of whimsy.
• Add a ribbon loop to make Halloween tree ornaments or tack them to a door wreath.

For more sewing inspiration, check out our newest collection CDs: Sew Beautiful 2004 and Sew Beautiful 2005. Each collection includes six full electronic issues of Sew Beautiful, complete with printable patterns, tips, techniques, how-to articles and more.

Sew On, Sew Well, Sew Beautiful,
Cyndi and Amelia

Wednesday, May 8, 2013

Sew a Vintage Button Monogram Pillow

Button Monogram Pillow
Vintage buttons are wonderful little works of art that come in all sizes, shapes and colors. So often, however, these pretty little trinkets wind up sitting in jars in our sewing rooms and never reaching their full design potential. Incorporate vintage buttons into your home décor with this tutorial for a Button Monogram Pillow. Designed by Laurie Anderson, the pillow is actually part of a trio of vintage button throw pillows that were featured in our January/February 2009 issue. You don't need a specific pattern to make the pillow - Laurie used a basic 14-inch pillow form and made the pillow cover to fit.

What you need:
Fabric: 1/2 yard of print fabric (fabric shown on samples is "Fontanelle" by Waverly);1/2 yard of white Kona cotton

Supplies: Vintage buttons all sizes, colors and shapes; Vintage handkerchief (10- to 12-inch square); 14-inch square pillow forms; Water-soluble stabilizer; Piping cord; Wash-away fabric marker; Fabric basting glue

Thread: Thread for lace embroidery (sample uses Isacord 9904); 60wt white thread (sample uses Mettler 60wt); 80wt pink thread for pinstitching (sample uses Madeira Cotona 80wt); Quilting thread for sewing buttons in place

Needles: Universal 70 needle; Universal 120 needle for pinstitching; Hand stitching needle to sew buttons in place

How to create:
1. Cut one 14-1/2-inch fabric square (print fabric); 1-1/4-inch-wide bias strips for 60 inches of piping (print fabric); and two 11- x 14-1/2-inch rectangles for back (white fabric).

2. Center handkerchief onto print fabric square and pin or glue-baste in place. Sew discreetly in place using either a narrow zigzag stitch, a pinstitch, decorative stitch or handstitching. If the handkerchief has lace edging it can be either left loose or tacked down.

3. Use a water-soluble marker to mark letter and button placement in corners.

4. Sew buttons in place using quilting thread.

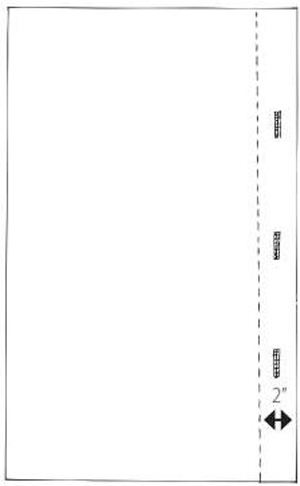
5. We'll now begin pillow construction. NOTE: Back of pillow opens like a sham with a button closure. On back piece, fold 14-1/2 inch edge under 1/2-inch then 2-inches under and stitch in place. This is center button facing.


Figure 1

6. Choose buttons for back closure, measure and mark buttonholes on one side. Stitch buttonholes and cut openings (fig. 1).


7. Overlap 2-inch hems and stitch edges together on overlapping sides. Lay top pillow onto back and square up to same measurement of front.

8. Cover 60 inches of cord with bias to make piping.

Figure 2
9. Stitch piping 1/4 inch away from outer edges on back pillow piece (fig. 2).

10. Stitch back to front with right sides together. Trim corners and turn right side out.

11. Sew buttons behind buttonholes on back closure.

For more home décor design inspiration, check out our new DVD, Home Decorating: Tricks & Techniques. You'll love learning resourceful solutions to your home décor sewing dilemmas, plus tips and tricks that will change the way you sew for your home.

Sew On, Sew Well, Sew Beautiful,
Cyndi and Amelia