
 | ||||||||
Editor’s Note: With the kids back-to-school, there's more time to sew! From Sept. 6-15, we’ll be celebrating “back-to-school” season in a number of different ways -- from ideas for sewing for children to inspiration for sewing for yourself!
Back-to-school
isn’t just for kids! In fact, for those of you with empty nests, it’s a
wonderful opportunity to find some creative “me time.” For today’s post, we’ve gathered together some of our favorite clothing designs for
women. Whether you’re looking for an heirloom lace blouse or a comfy knit
jacket, there’s something to suit any style:
Daisy Top – When we first spotted what has come to be known as the
“Daisy Dress” hanging among a collection of Martha Pullen’s antiques, we knew our
readers would fall in love with a reproduction dress. What we didn’t know was
that it would inspire Helen Lively to make an irresistible top for adults, but
here it is. The clever designer worked up a contemporary version in black voile
with ecru cotton trim. She changed the shape of the sleeve to fan out a bit
more than the original girl’s dress and added a drawstring inside the lower
bodice seam for a more fitted silhouette at the hips. Download the Daisy Top instantly and
start working on this project today!
Timeless Lace Heirloom Blouse – For the
past few seasons, a number of highend designers have infused their collections
with touches of heirloom sewing. But as to be expected, at the same time
they’ve made purchasing an age-old tradition extremely fashionable, they’ve
also made it a very expensive proposition. You, however, have the goods and the
sewing talent to capture this trend for little expense using scraps of lace and
fabric in your stash. It’s a very savvy and stylish way to use up those small
yardages you’ve been accumulating. Here, Andrea Birkin used the pattern "Vogue
Basic Design Custom Fit 8689 View C (multi-sized)," and created
lace panels for each side of the center front placket and one down the center
back. She also created lace blocks for the yokes. Instructions for recreating
the lacy embellishments are in Sew Beautiful issue #152.
Cape Cod Jacket – This basic, stylish Cape Cod Jacket designed by Nancy Zieman can be made quickly, and it looks and feels great. The
garment has three variations and was designed specifically to work with knit
fabric.
Shana Tunic – The Shana Tunic from Sis Boom combines a comfortable fit
with a classic appeal. The design features a unique keyhole neckline with
delicate tucks. This top is free fitting, yet gently curves in just the right
spots to accentuate the figure. The bell sleeves add flair and femininity.
Patricia Tunic – The Patricia Tunic from Sis Boom is cool, comfortable and
elegant. It is just as perfect for running errands as it is for an evening out
on the town. Wear with cropped white pants, jeans or even a skirt. With lots
of size, length and finishing options, you can create a range of looks for
yourself and your friends.
Fleecy Rose Scarf – We can’t leave out
the accessories! This simple-to-sew scarf featured in Kay Whitt’s Sew Serendipity Workbook will keep you super warm while looking stylish, all at the
same time. The construction is so easy that you will find reasons to make more
than one! The scarf is composed of two layers of fleece, so you could easily get a
totally different look by using two coordinating or contrasting colors. The
addition of elastic down the center with a hidden opening to pull the end through
makes the scarf slightly springy in nature adds to the comfort level. The roses
are optional, so if an unadorned look is more your style, simply leave them
off.
Shop our "Back-to-School" sale for a variety of women's patterns at 50 percent off - plus the fabric, notions and more you need to complete your "me time" projects!
|
Showing posts with label Nancy Zieman. Show all posts
Showing posts with label Nancy Zieman. Show all posts
Monday, September 8, 2014
Back-to-school = Back to 'me time'


Wednesday, May 29, 2013
Serge With Confidence: Part 5
 |
| May Book Blog: Serge With Confidence by Nancy Zieman |

Turn up the bottom hem to the wrong side so that the serged edge just overlaps the lower edge of the shadow stitching(you should be able to see it through the fabric).

Press and take to the sewing machine. Topstitch on the right side just beside the shadow stitch line in thread color that matches your project. The stitching will catch the hem on the wrong side.
Now since your bonnet piece is curved all the way around, you will need to ease in the hem. Run two gathering threads at least 4.5 inches long 5/8 inch and 1/4 inch from the curved edge.

Pull the threads around the curve gathering slightly so you can fold the edge under to slightly overlap the shadow stitching line.


Press. Straight stitch from the front around the outer edge, just as you did across the hem edge. This will create your casing. (You will have some gathering on the wrong side of the fabric, but since the bonnet is drawn up with a ribbon, this is fine.)
Run a ribbon through the casing using a safety pin.

Pull up the bonnet to fit. To secure the bonnet shape, stitch through all layers (including ribbon) at the edge of shadow stitching beyond the casing opening.

Tie knots in the end of each ribbon.
Gift a new baby girl with this sweet little serger set.

-Amelia
Friday, May 24, 2013
Serge With Confidence: Part 4
|
| May Book Blog: Serge With Confidence by Nancy Zieman |
First, place each organza piece to each batiste piece, wrong side of organza to right side of batiste, and baste around the edges to join.

Treat as one from this point on.
Change your serger setup to a three- or four-thread overlock stitch and finish the jacket edges along the front facings. Fold the facings to the right side of the garment along the foldline and stitch across the facings 3/4 inch from the top just to the end of the serged finish and 1-1/2 inches from the bottom across the facing.
Mark all the way around your neckline edge 1 inch from the shadow-stitching line.


Stitch up your side seams making sure to align the shadow stitching.

Finish with the serged edge. (You could serge only, but you run the risk of misaligning the shadow stitching).
Serge all the way around the bottom edge of the jacket (facings are still turned back.)
For many serged baby items, you could serger finish the neckline and simply fold back the narrow edge and topstitch to finish. For this design, however, I needed the turned-back edge to meet the shadow stitching, and to fold back a wider finish along a curve requires you to clip the curves into the finished, serged edge. You could do this, however it leaves raw fabric along the clips and isn’t a very attractive finish.

Instead I suggest finishing with a bias strip from the batiste. Cut the strip 1-3/4 inches wide. Fold it in half and press in a circle shape echoing the shape of the your neckline. With the raw edges of the bias aligned with the raw edges of the jacket and working on the right side of the jacket, sew around the neckline with a 1/4-inch seam. Trim the ends of the bias so they overlap the turned-back facing approximately 1 inch. Clip the curves, turn the bias binding to the wrong side, turn the facings to the inside of the jacket (this will also flip the bottom hem up as well) and press around the neck, the hem and down the facings. The bottom hem should meet or be positioned slightly beyond the bottom shadow stitching.

To secure you could hand blind stitch, but it is just as clean and easier to topstitch so that your topstitching lies right beside the shadow stitching line. Use thread to match the garment fabric on the shadow stitching (in this case a fine cream thread). The stitching is barely detectable and you catch the hem on the underside.

The neck bias aligns just beyond the edge of the shadow stitching as well, and you will secure it in the same manner.

Serger finish your sleeve edges, turn up the hem to the shadow-stitching line, press and topstitch as for the jacket. Stitch the sleeve seams aligning the shadow stitching and finish the seam allowance with a serger.

Gather the sleeve cap and set into the garment, finishing with a serged edge. This is a small area to work in, so stitch slowly and carefully.
Add a ribbon closure as instructed in the pattern.

Apply a clear snap on the underlap to secure.
Next week, we will tackle our little drafted bonnet to complete the set.
And on a side note, I actually chatted with Nancy Zieman at Quilt Market in Portland; she was signing copies of her Sew Knits with Confidence book at the F+W booth. And she assured me that my suggesting you catch a skipped stitch with a needle and thread was perfectly acceptable. So we can all relax and forgive our little sewing flaws.
-Amelia
Friday, May 10, 2013
Serge With Confidence: Part 2
|
| May Book Blog: Serge With Confidence by Nancy Zieman |
I asked you last week to gather your materials, but two things I failed to mention were KK2000 Temporary Spray Adhesive and Roxanne’s Glue Baste-It. Since we’re working with two fabrics, the spray is handy for adhering the layers together, particularly since organza against batiste is a very slippery proposition. I personally like to lightly spray the surface of the batiste and layer the organza on top before cutting out the pieces, so they will be cut out the exact same size.

Roxanne’s glue is an option to baste stitching hems in place prior to stitching. Also, pre-wash both your fabrics before starting. And I’m thinking when we get to the cover stitching next week, I may try it with some wash-away stabilizer first since organza might need the extra support; so have that on hand.
Another tip I should have mentioned last week before getting started is to check the availability of wooly nylon threads before you decide on your batiste color. My initial thought was to use blue, but Gutermann’s Bulky Nylon, which is available to me locally, didn’t have a shade of blue that would work. So instead, I’m using cream batiste, white organza and pink thread for the cover stitching.
Preparation:
1. Before we can start with the decorative part of serging our project we have to cut out the jacket pattern, which if you’re using Burda 9645 are pieces 14, 15 and 16. I altered the pattern in two ways. First, I preferred a straight sleeve rather than the slight bell design given in the pattern, so before cutting out, I folded the sleeve pattern straight down from the underarm on both sides.

2. Second, since I didn’t want the cover stitch to be altered in appearance over the shoulder seams, I overlapped the front jacket piece and the back piece on the 5/8-inch seamline, pinned it together and cut it out as one on the fold.
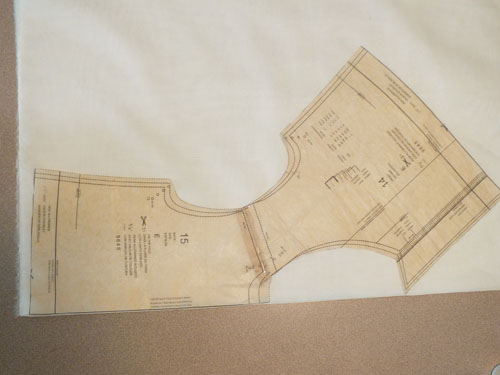
I used the adhesive spray and cut both my batiste and organza layers out together, but you may prefer to cut them separately. Set all the batiste pieces aside for now.
3. The cover stitching will be done on the organza jacket layer. The trickiest part here is making sure the cover stitch will be at the same level across the bottom of both the front jacket and back jacket, so when you join the jacket at the side seams, the shadow stitching lines will match up. Measure up from the bottom of the organza jacket piece 2-1/2 inches. Take a heat or water-soluble marking pen and mark all the way across the bottom on both front and back.
4. Mark 1-1/4 inches in from the neckline all the way around the jacket opening, measuring in from the facing fold when you get to that point. Since you’re working with sheer organza, it is best to place it on top of a dark surface in order to see the edge of the fabric.

Bonnet Preparation:
For the simple bonnet, you’ll need to create a single pattern piece that looks basically like a big gumdrop.
1. Trace off a rectangle 6 inches deep by 15-1/2 inches wide. Draw a line down the center of the rectangle. Measure up 7 inches from the center and make a point. Starting at the right corner of the rectangle, draw a curve up to the center dot. Repeat for the other side.

2. Cut out an organza and a batiste bonnet piece; set the batiste piece aside.
3. To mark the organza bonnet for cover stitch, measure up from the straight lower edge 1-1/2 inches and draw a guideline across. Measure in 1 inch around the curved edge and draw a guideline completely around.
Next week we will tackle our cover stitching on our organza overlay pieces.
-Amelia
Friday, May 3, 2013
May book blog: Serge along with us!

Hello again, Amelia here, back to blog about a book for May.
This month I’ve picked something to challenge myself, Serge with Confidence by Nancy Zieman. This isn’t a new title. In
fact many of you may have it, but it’s the perfect book, if, like I am, you’re
a bit intimidated by the thought of serging anything but a seam.
What caught my
eye while flipping through the pages was the adorable little bonnet and jacket
set on page 71. Nancy used the cover stitch option to basically achieve the
effect of shadow embroidery. I’ve used the cover stitch function on my machine
before. Some of you will remember the old-fashioned, one-piece Lycra bathing
suit I made for my son Ellis featured in Sew
Beautiful. But I’ve never tried to engage cover stitch for decorative purposes
using fine, heirloom fabrics.

Throughout the month, you are welcome to
journey with me as I construct this set. Although Nancy doesn’t name the
pattern she used in the book, I found a very similar pattern from Burda, kids
#9645, for the jacket, and I will provide dimensions for the little bonnet. I’ll
be using batiste, organdy and ribbon from Martha Pullen Company and
embellishment instructions from Nancy’s book. So gather your materials and
check back next week, as I get started.
-Amelia
Thursday, September 20, 2012
Video with Kay & Tilda Kit Giveaway!

A couple of years ago, when Sew Serendipity was still brand new, Kay Whitt sat down and did a 2-part series with Nancy Zieman on "Sewing with Nancy!"
Kay talks about the book & the designs inside:
A TILDA Giveaway!!
Tilda Lunch Bucket Bag Sewing Kit

When you were a kid, it was the metal box or the brown paper sack. Now, it’s the grocery store’s plastic bag you took it home in. Your lunch deserves better! Transport it in style with the fruits of this kit - the Tilda Lunch Bucket Bag Sewing Kit.
You’ll make your co-workers jealous when they see your fashion-forward lunch bucket bag, created with ease using the kit instructions and charming Tilda fabrics. But the lunch bucket bag doesn’t just let you carry your nosh fashionably - the sturdy handle hardware and drawstring closure design make transporting food without spillage a breeze.
Not only fit for carrying your lunch to the office, this bag is the perfect vessel for bringing snacks to the park, or for your granddaughter to take her lunch to school in. You could even use it as a casual summer handbag – no lunch required!
This kit includes:
• Lunch Bucket Bag CraftAble by Kay Whitt, excerpted from her book Sew Serendipity Bags
• Tilda - Molly "Fruit Garden" 100% cotton fabric for bag exterior & handle (Fabric A) - 5/8 yard
• Tilda – “Christmas House" 100% cotton fabric for lining, binding & drawstring (Fabric B) - 5/8 yard
• Tilda - Tammie "Fruit Garden" 100% cotton fabric for top of bag (Fabric C) - 1/2 yd
• Peltex 71 Fusible Stabilizer - 3/4 yard
• Pellon Fusible Interfacing - 1 yard
• 2 x 1-1/4" rings for handles
Finished dimensions of bag
10” (counting the drawstring unit) x 7” (25.5 cm x 18 cm), without the handle
The handle has an 8” (20.5 cm) drop
10” (counting the drawstring unit) x 7” (25.5 cm x 18 cm), without the handle
The handle has an 8” (20.5 cm) drop
Go HERE to enter to win yours!
OR..
Just go get your own copy! It is on sale at our store!
Retail: $47.19
Your price: $37.57
You save: $9.62 (20%)
Friday, September 14, 2012
Serge with Confidence!

Learn to Serge with Confidence!
Today we are giving away a copy of Nancy Zieman's popular book!

First build your confidence by learning the basic techniques and tools needed on your way to serging success, and then put those skills to use by creating one of the many showcased projects.
Whether you are a beginning serger or you have been using your machine for years, Serge with Confidence is the No. 1 resource to have on hand in your quest for serging excellence.
You'll find in this book:
Comprehensive overview of a serger and how to use it
Overview of the types of stitches available, products and tools
18 inspirational projects, from wardrobe pieces and accessories to home decor, and holiday ideas, all fully illustrated and beautifully photographed
Through guide to keeping your serger running smoothly and trouble-free
So what are you waiting for...go ENTER!
One of our sponsors for National Sewing Month is
Everyone wants to feel special...
What a gift it is to see the face of a loved child light up, because you have made them feel so special, by sewing a lovely dress or outfit especially for them!
Sharon McNider, owner of Nostalgic Needleworks, has been helping her customers bring smiles to little faces for over 13 years, by designing unique heirloom garments, choosing just the right materials, and coaching throughout the sewing process. Now she can help YOU create a one-of-a-kind heirloom, too!
Heirloom garments are certainly appropriate for the following special occasions: Baptisms, First Communion,Portraits, Easter, Christmas, Weddings, or just because you want them know they are special!

Sharon has graciously donated to our giveaways! The winner will be treated to a custom heirloom garment (from Nostalgic Needleworks) for you to make, choosing and shipping all the materials you need to make the design a reality. Today's winner will receive a free preliminary sketch (a $40 value), and 15% discount on the materials for their project. To see how Sharon at Nostalgic Needleworks can help you, visit her website at www.nostalgicneedleworks.com. Click HERE to enter!
Tuesday, September 11, 2012
Hems with Nancy + book giveaway!

Continuing with techniques taught by the talented Nancy Zieman, today we give you an excerpt from her book,
Sewing A to Z.

Hems
Nearly
everything you sew has a hem—skirts, pants, sleeves; even home décor items such
as curtains and table linens. By using a few simple hints, you can turn this
time-consuming chore into a simple sewing task.
1. Prepress
the hem on each flat piece before stitching it to another piece. This is a
great timesaving technique. Use an Ezy-Hem Gauge to provide an accurate
measurement and to avoid leaving a hem impression on the right side of the
fabric. Place the gauge on the wrong side of the fabric. Fold up the hem
allowances over the gauge to the desired width and press. (HM1)

2. Grade the seam allowances within the hem area to reduce bulk. (HM2)

3. Finish
the cut edge of the hem by zigzagging or serging. (HM3)

4. Hand
stitch the hem in place using a blind hem stitch.
• Thread a
needle with a single strand of thread. Cut the thread about 18" long. The
thread will tangle and knot more easily if it is too long. Knot one end of the
thread.
• Fold back
the hem edge so ¼" of
the edge shows. (HM4)

• Work from
right to left.
• Take a
tiny stitch in the hem; then take a tiny stitch in the project about ¼" ahead of that stitch. Pick up
only one or two threads in the fabric.
• Take a
stitch in the hem edge about ¼" ahead
of the last stitch.
• Repeat,
alternating stitches between the hem edge and the project. Don’t pull the
stitches too tight or the hem will pucker. (HM5)

5. As an
option, stitch the hem using a machine blind hem stitch.
• Fold back
the project edge so about ¼" of
the hem edge shows.
• Adjust your
sewing machine for a blind hem stitch as detailed in your owner’s manual.
• Stitch so the straight stitch
falls in the hem allowance and the zigzag just catches the project at the
fold. (HM6)

We want to give a copy of Nancy's book to one lucky follower!
Click the link below then fill out the form to enter!
Click the link below then fill out the form to enter!
Winners announced next Monday.
Subscribe to:
Posts (Atom)