Monday, October 14, 2013

Create Stuffed Sewing Stash Pumpkins

Our finished pumpkins!
With Halloween and Thanksgiving quickly approaching, it's prime time to decorate your home with lots of fun seasonal décor. These whimsical stuffed pumpkins are impressive to look at, easy to assemble and the possibilities for embellishment are endless!

Created by our design manager Leighann Lott, these pumpkins first appeared in our September/October 2009 edition and can be used in your home year after year. Each sample pumpkin pictured here has been dressed in detail using wooden spools, ribbon, miniature buttons and floral wire, while the largest pumpkin is machine embroidered with a design from Mary's Graduation Dress Designs CD, available in our online store. 

When you're finished creating your pumpkins, set them on a table alone or group them together to create a stunning, sewing-inspired centerpiece for fall.

What you need:
• Fabric and ribbon scraps
• Needle and heavy-duty thread
• Polyester stuffing
• Wooden spools
• Permanent marker, paint or stain
• Silk or fabric leaves
• Floral wire
• Craft glue
• Tracing pen or pencil
• Buttons (optional)
• Rice or dried beans (optional)
• Embroidery thread (optional)

Instructions:
Cut - Trace a circle onto fabric and cut. Varying circle size will give you different sized finished pumpkins (photo 1).


Photo 1

Stitch - Fold fabric edge 1/4 inch and sew a running stitch using heavy-duty thread (just like a large yo-yo). Gently gather fabric as you stitch (photo 2). You will create a loose ball with a hole in the center.


Photo 2

Stuff - Fill pumpkin shell with polyester stuffing. TIP: Adding rice or beans first will add weight to the bottom. Pull thread and gather fabric until opening is approximate diameter of wooden spool. Tie off thread (photo 3).


Photo 3

Create Pumpkin Sections - Anchor thread or embroidery floss near opening and wrap thread around entire ball of fabric to opposite side of hole. Insert needle into fabric to anchor and pull thread slightly to form a groove in pumpkin. Take a couple of stitches to secure. Stitch through gathered edge to begin next section and repeat to form another groove. Repeat steps to form six or eight puffed sections. Tie off thread (photo 4).


Photo 4

Stem - Paint or stain wooden spool(s). Wrap spool using ribbon scraps and put a small amount of glue on end to secure. TIP: Glue buttons to spool top to decorate. Glue two spools together to make a longer stem if desired.

Ribbon Stem Cap - Cut a length of ribbon the same diameter as fabric circle used to make pumpkin body. Sew a running stitch along one long edge of ribbon. Gather gently as you stitch. When you reach opposite end of ribbon, pull thread to form a ruffled circle of ribbon that will fit closely around stem. Keeping center opening the  size needed to fit over spool, put right sides of ribbon ends together and continue running stitch along short edge to join ribbon ends together. Tie off thread (photo 5).

Photo 5
Assemble - Position stem cap over opening in pumpkin (photo 6). Insert stem through stem cap into opening. If opening is too large and loose, make a couple of stitches and pull to cinch in opening snuggly to stem.

Photo 6
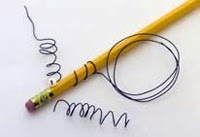
Finishing Touches - Glue silk or fabric leaves in place around spool stem. Curl varying lengths of floral wire around pencil to resemble tendrils of a pumpkin (photo 7). Place in opening between leaves and spool stem (photo 8). If necessary, secure with glue.

Photo 7
Photo 8
More great ideas:
• Use unconventional colors like moss green, off-white and autumn colors.
• Add a bit of texture to enhance your pumpkin sections by adding embroidery to your fabric before cutting your circles.
• Hand embroider a Jack-o-lantern face on one side.
• Apply beads for a touch of sparkle.
• Add small buttons at the end of the tendril for a touch of whimsy.
• Add a ribbon loop to make Halloween tree ornaments or tack them to a door wreath.

For more sewing inspiration, check out our newest collection CDs: Sew Beautiful 2004 and Sew Beautiful 2005. Each collection includes six full electronic issues of Sew Beautiful, complete with printable patterns, tips, techniques, how-to articles and more.

Sew On, Sew Well, Sew Beautiful,
Cyndi and Amelia

Wednesday, October 9, 2013

Fall and Holiday Sewing Inspiration

October/November 2013
Fall is in the air, and the holiday season is right around the corner! Our newest issue of Sew Beautiful combines both fall and holiday sewing inspiration, so when you're working on fall projects you can be actively planning your special holiday garments, too. 

Projects include a lovely lace overlay skirt, an elegant three-dimensional appliquéd leaf table runner and a delightful "Happy Scarecrows" picture smocking design. We're also proud to share our contest winners from the 2012 Martha Pullen Sewing Awards and much, much more. Read below for more about a few of our favorite projects this issue has to offer:


Martha Pullen Sewing Award Winners - We received more than 150 entries for Martha's 2012 Sewing Awards, and a panel of judges from Martha Pullen Company and Sew Beautiful magazine individually assessed each one. Winners were chosen in seven different categories. Pictured above is the grand prize winner, a flower girl dress created by Martha Broyles of Ballwin, Mo. 


Lace Overlay Skirt - I (Amelia) based this design on a tweed skirt with an orange guipure lace overlay I saw in a booth at a sewing expo in Michigan. I started with a basic, straight pencil skirt pattern and used a wide butterscotch galloon and a coordinate suiting for the underskirt.


Happy Scarecrows: Jack and Jill Straw Smocking Plates - With crisp fall weather comes the autumn harvest and the delightful and ever-so-practical emergence of the scarecrow. Being one of the most familiar figures in the American rural landscape, this ragged character is a natural motif for back-to-school apparel. Let Gwen Milner's Jack and Jill Straw smocking design put a smile on the face of your little adventurer(s). Jack stands in a cornfield while Jill poses among the sunflowers.


Appliquéd Heirloom Christmas Tree - Christmas memories are like having treasured heirlooms in our hearts for a lifetime. Create a cherished memory for your little girl by making her a holiday jumper accented with this appliquéd tree. Designed by Trisha Smith, the tree is decorated with a tatted garland and then embellished with Swarovski Hot Fix Crystals.


Green & Gold Silk Elegance Smocking Design - Smocked in an elegant diamond and serpentine pattern in glorious gold and traditional shades of red, this smocking design from Cheryl R. Davidson captures the essence of the season brilliantly. Pair it with our "Pascale" Sew Beautiful Collection Pattern and luxurious green silk dupioni - as pictured here - and you'll have a dress made for holiday celebrations.


Sew On, Sew Well, Sew Beautiful,
Cyndi and Amelia 

Thursday, October 3, 2013

Make a Personalized Handkerchief Pillow

Handkerchief Monogram Pillow
This lovely monogrammed handkerchief pillow designed by Gail Settle is perfect for a quick all-occasion gift. The monogram adds a personal touch, but any design can be stitched in the center. If you would like to make a quick ring bearer's pillow, omit the monogram and stitch a 9-inch length of ribbon to the center for securing rings.

What you need:
• Two 12- x 12-inch hemstitched handkerchiefs
• Two 7-inch squares of white cotton fabric for pillow filler
• 2 yards of 1/8-inch silk satin ribbon 
• Fiberfill for pillow filler
• Floriani® Wet-n-Gone Tacky™
• Sulky® Solvy™ water-soluble stabilizer
• Regular construction thread
• Size 75 embroidery needle
• Water-soluble marking pen
• Size 18 tapestry needle for ribbon weaving
• Embroidery design of your choosing
• Rayon embroidery thread (white)

Embroidery Instructions:
NOTE: The rose border design pictured on our sample pillow is available to download on our website. Click the "Web Extras" tab, then "Free Machine Embroidery Designs." You'll find it on the bottom row of designs. Gail used a script font from her Pfaff 3-D software package for the lettering -- choose your favorite font to fit the center space. Gail created one combined design for a 5 x 7 hoop; if you use a 4 x 4 hoop, stitch the monogram in the center of the handkerchief before stitching your border design.

1. Print a template of your design, align and mark or crease fabric for placement on right side of one handkerchief.

2. Hoop a piece of Floriani® Wet-n-Gone Tacky™ and score center to remove paper from inside hoop area. Mark center lines on tacky stabilizer with marking pen. 

3. Place handkerchief on stabilizer aligning center lines. Place a sheet of Solvy™ on top. Attach hoop to machine and baste.

4. Stitch out embroidery and monogram in white thread.

5. Cut away excess stabilizer and soak to dissolve remaining stabilizer.

Pillow Instructions:
1. Cut 1/8-inch ribbon into four equal pieces. Thread one end of one piece through tapestry needle and weave through first row of hemstitching closest to embroidery. Leave 4-inch ribbon tails at each end. Repeat for two more sides, leaving one side open for inserting pillow filler (fig.1).


2. Straight stitch along edge of center square just next to ribbon and hemstitching on three sides woven with ribbon (fig. 2).


3. Make a pillow insert by stitching two 7-inch cotton squares with a 1/2-inch seam allowance. Leave a 3-inch opening on one side for turning and stuffing (fig. 3). Stuff with fiberfill and close opening by hand.


4. Insert pillow between handkerchief layers. Close final edge with ribbon through hemstitching and straight stitch along edge as before. 

5. Tie bows at each corner to finish.

Visit our online store to discover more embroidery and monogram projects!

Sew On, Sew Well, Sew Beautiful,
Cyndi and Amelia

Wednesday, October 2, 2013

Sew an Extra Stable Lace Finish

Sometimes small, simple changes can yield big results in our sewing. Today we'd like to show you how to sew an extra-stable lace finish along a fabric edge. Anyone who has sewn with lace knows what a delicate fabric it is. Using this technique will reinforce your stitched lace edge to ensure that your heirlooms last for years to come.

1.  Pin the lace to the right side of the fabric with the heading even with the seam allowance line and the right side of the lace facing up. Using a small zigzag (L=1.0; W=1.5) and a 70 Universal needle, stitch the heading to the fabric (fig. 1).


Fig. 1

2.  If the lace is being attached to a curved edge, shape the lace around the curve referring to the lace shaping directions. If necessary, pull the uppermost thread in the lace heading to make the lace lie flat (fig. 2a). 


Fig. 2a

For inside curves, shape the lace into a curve on the ironing board before placing it on the fabric. This will keep the scalloped edge from being wavy (fig. 2b).


Fig. 2b

3.  Press the seam allowance away from the lace, toward the wrong side of the fabric (fig. 3). 


Fig. 3

If the edge is curved or pointed, you may need to clip the seam allowance in order to press flat (fig. 4).


Fig. 4

4.  On the right side, use a short, narrow zigzag to stitch over the lace heading, catching the fold of the pressed seam allowance (fig. 5) or follow step 7 below.


Fig. 5

5.  On the wrong side, trim the seam allowance close to the stitching (fig. 6).


Fig. 6

6.  If the design includes miters, stitch them with a small zigzag (fig. 7).


Fig. 7

7.  Optional:  

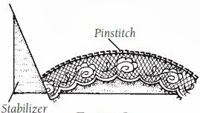
a. Place a lightweight tear-away stabilizer to the wrong side of the lace shaping area. Change to a 110 or 120 Universal needle.

b. From right side of fabric, pin stitch the lace to the fabric along the heading of the lace (L= 2.5 - 3.0; W= 2.0 - 2.5) (fig. 8). Carefully remove the stabilizer.


Fig. 8

If you'd like to learn more lace techniques, be sure to check out our DVD Normandy Lace with Martha Pullen. Normandy lace refers to the patchwork quilt of lace. It usually consists of a central motif with beautiful pieces of lace, embroidery and overall lace forming the body of the piece. 

On the DVD, Martha will show you the tricks of machine embroidery on netting, along with what stabilizers and thread to use. You will also learn how to create lace-shaped diamonds, hearts, curves and more.

Sew On, Sew Well, Sew Beautiful,
Cyndi and Amelia

Tuesday, October 1, 2013

How to Embellish with Whimsy Sticks


If you'd like to add whimsical embellishments to your next sewing project, Kari Mecca's Whimsy Sticks are just the ticket. These creative tools are used to make playful and precise loops that can be easily transformed into an endless variety of trims and flowers. This simple technique of wrapping ribbons and trims around these "sticks" will have you creating mounds of embellishments for your favorite projects in no time. Discover tips and tricks for using these clever tools and learn how to create a Single Loop Trim and Single Loop Flower in the following excerpt from Kari's book More Sewing With Whimsy. 

Made of high quality green acrylic, each Whimsy Stick is a different width for varying sizes of flowers and trims. To use sticks, you will need 1/4- and 1/2-inch-wide rolls of a low tack or basic masking tape. Test tape on trim before using. If tape is too sticky, apply pieces to a smooth surface several times to reduce tack. To make yards of trim, wrap ribbon around stick and apply tape to hold wraps. Remove stick and sew trim according to project. Trim can then be sewn to garments or made into flowers.

Kari's Hints for Success:
• To quickly wrap stick, hold trim out taut and twist stick guiding ribbon as it wraps.
• Wrap trim loosely, leaving 1/8 inch between wraps on narrow trims and up to 1/4 inch on wide trims.
• Do not pull tacking stitches tight, unless instructed.
• Once pinned, view flower from right side and make adjustments, if needed.
• When wrapping, make sure petals (loops) do not “stack.” They should be offset from previous layer.
• If making several flowers, cut looped trim into desired lengths before making flowers (this will ensure you do not run out of trim).

Single Loop Trim:
1. With ribbon right side up, tape end to end of Whimsy Stick labeled "start here" (photo 1).
Photo 1
2. Wrap ribbon around length of stick, leaving a 1/16- to 1/8-inch space between wraps (photo 2).
Photo 2
3. Push wraps toward start, adjusting so ribbons lie side by side and wraps are smooth. Continue wrapping and smoothing until entire length of stick is covered (photo 3). If wraps are too tight, it is difficult to remove from stick.
Photo 3
4. Apply tape over wraps on both sides of stick (photo 4).
Photo 4
5. Remove tape at end of ribbon and slide wraps off the "start here" end of stick. If you are wrapping long lengths of trim, slide wraps leaving 3 to 4 taped wraps on stick. Continue wrapping and taping the length of trim. Overlap tape ends when applying and remove from stick when completed (photo 5).
Photo 5
6. Place taped trim under presser foot and sew close to one edge of wraps; make sure you do not sew through tape (photo 6).
Photo 6
7. Remove tape from finished loops (photo 7). Hint: Tape can be reused several times.
Photo 7
Single Loop Flower:
Before you begin, 
• Make single loop trim (above) using desired ribbon and Whimsy Stick.
• Thread milliners needle with beading thread and knot ends together.

1. Hold trim with stitched edge at bottom and fold end of ribbon down (photo 8).
Photo 8
2. Loosely wrap trim around end two to three times. Cut trim and fold end down when flower is desired size (photo 9).
Photo 9
3. Turn flower upside down and insert pins across flower base to hold. Using hand sewing needle, stitch across entire base of flower making sure to keep tension loose. Repeat several times keeping wraps loose as shown. Knot thread to finish (photo 10).
Photo 10
Single Loop Flower

Check out our Sewing Whimsies with Kari Mecca Ultimate Collection for more from Kari Mecca. This kit includes three books (Sewing With Whimsy, More Sewing With Whimsy and Whimsy Flowers & Trims) PLUS three DVDs (Secrets to Stitching Bullion Whimsies, Whimsical Appliqué and Whimsy Flowers & Trims)! The “Whimsy Flowers & Trims” book comes with a sample set of punch-out Whimsy Sticks inside, so you can start creating right away.


Sew On, Sew Well, Sew Beautiful,
Cyndi and Amelia

Monday, September 30, 2013

Sewing with Lace and Entredeux

Our special edition, Sew Beautiful's Favorite Heirloom Sewing Designs, is a collection of our most beautiful and inspirational articles, pictorials and free patterns. We poured over decades of magazines to bring you this "best of the best" publication, which also features a section full of tips and tricks for many frequently used heirloom sewing techniques. Below, we'd like to share tutorials for "Lace to Entredeux" and "Gathered Lace to Entredeux" - two techniques that you will see in almost every heirloom garment. Follow these steps from Sue Stewart for perfect results that any "heirloomist" would be proud of.


Keep the following points in mind as you work:
• The thread used is important. Regular polyester or cotton-covered polyester sewing thread is simply too stiff and heavy to give good results. Madeira Tanne 80, a very soft, fine thread, is good to use for embellishment. Mettler 60 is a slightly heavier thread that is also suitable, and a little easier for both you and your machine to work with; it should be used in both the needle and the bobbin. The thread should also match the color of the lace.

• A small needle to go with the fine thread is also important. For the following techniques, use a new size 70 universal needle and make sure your machine is clean, oiled and running smoothly.

• The stitch settings given are not absolutes. Different machines stitch out differently. Use the settings given as starting points, adjust up or down as needed and use what works best for you.

•  In many cases, heirloom techniques are used to create fabric blocks or fancy bands that are slightly larger than needed from which garment pieces or fancy bands are then cut or trimmed to size.


Lace to entredeux
Lace to entreduex:
1.  Starch entredeux well, and press dry. This is important, because it helps to pre-shrink entredeux. If this step is omitted, when the piece with entredeux stitched into it is washed, entredeux will shrink and pucker fabric.


Photo 1
2. Trim batiste edge off one side of entredeux right next to heavily embroidered "ladder." There should be no fabric remaining on that side; entredeux will not ravel (Photo 1).

3. With lace and entredeux both right sides up, butt trimmed edge of entredeux to heading of lace insertion.


Photo 2
4. Zigzag (L=1.0; W=2.5 - 3.0) together so that one needle swing stitches over heading of lace, and other needle swing goes into holes of entredeux (Photo 2).


Gathered lace to entredeux

Gathered lace to entredeux:
1. Trim waste fabric from one side of entredeux.

2. Gather lace to desired fullness to fit entredeux strip by pulling the uppermost thread in lace header. Pin strip of gathered lace to ironing board or padded surface right side up. Adjust gathers evenly. 

3. Cut a piece of Tiger Tape the length of gathered lace strip. Tape strips may also be cut in shorter lengths if you are curving the gathered lace or applying tape to a very long strip of lace. 

4. Stick Tiger Tape to gathered lace strip just below lace header (between 1/8 and 1/4 inch from the lace header edge). This will hold lace gathers in place as you stitch lace to entredeux. 

5. Set tension settings to normal balance. Place matching lightweight thread in bobbin and needle. Thread should match entredeux and lace. 


Photo 3
6. Set machine for a center zigzag (L-2.0-2.5; W=3.0-3.5). Remove lace from board and place trimmed edge of entredeux and gathered lace header side by side, right sides up with edges touching. Length should be adjusted so left swing of zigzag hits as many consecutive holes in entredeux as possible. Width should be adjusted so zigzag travels from hole of entredeux to inside edge of gathered lace edging and pulls lace header snuggly against entredeux (Photo 3).

Photo 4
7.  When gathered lace is attached, remove Tiger Tape (Photo 4).

Be sure to check out Favorite Heirloom Sewing Designs for more heirloom projects and techniques! Create your own work of art using the patterns we've provided or use this issue as the catalyst to revisit your heirloom pattern stash to find your favorites.

Sew On, Sew Well, Sew Beautiful,
Cyndi and Amelia

Tuesday, August 20, 2013

Sew a Pretty and Practical Pincushion

Round Pincushion

We all know it's true - you can never have too many pincushions. It's not unusual to have one by the sewing machine, one by the couch, one on your bedside table and one in your travel bag; we sewing fanatics are always in need of a place to stick loose pins. This round pincushion was designed by Jean Etheridge and can be created in any color scheme to match your personal style and surroundings.

You can always use fiber filling to stuff your pincushions, but personally, we prefer a more densely weighted cushion. As an alternative, try using crushed walnut shells or sand for stuffing. You can find crushed walnut shells as bird litter at your local pet store; it is also sold at some specialty sewing and quilt shops. If you do use crushed shells or sand, we recommend an inner lining be included in the construction to prevent the shells from possibly working their way through the outer pincushion cover.

Materials:
• Small amount of fabric for two 5-inch circles
• Two buttons (large-holed to fit the large needle)
• Pearl cotton (#5)
• Polyester fiberfill
• Doll sculpture needle
• Optional charm (We bought ours in a multipack from the jewelry section of our local craft store)

Instructions:
1. Cut two circles of fabric about 5 inches in diameter.

2. With right sides together, sew around the circle, leaving about a 2-inch opening for turning (fig. 1).


3. Turn the circle right side out. Stuff until quite firm.

4. Stitch 2-inch opening closed by hand.

5. To form pie-shaped wedges, cut a very long strand of pearl cotton and knot one end with a substantial knot. Using a long, sturdy needle (one meant for doll sculpture works well), start at the bottom of the pincushion and push the needle all the way through the center of the stuffed circle form. Then pull the thread from the top around the side and back to the center point on the bottom. Go back up through the middle, down the other side, and up through the same point. Pull the pearl cotton snugly each time (fig. 2).


6. Continue until you have six pie-shaped sections. Knot thread at bottom.

7. Use one long pearl cotton thread to sew the top and bottom button to the center of the pincushion using the long needle. Start at the bottom, go through the holes of the button, up through the pincushion and through one hole of the top button. Then sew down through the other hole of the top button and down through the hole of the bottom button (fig. 3). Repeat several times and then secure the thread on the bottom.


8. Attach a sewing charm to the top button or the center of the pincushion.


Sew On, Sew Well, Sew Beautiful,
Cyndi and Amelia