Thursday, May 30, 2013

Transform a Tea Apron into a Pretty Pinafore!

Vintage Apron Pinafore by Mary Caviness

As sewists, we love to admire our treasured family heirlooms, yet we often keep them tucked away in our attics for "someday." Designer Mary Caviness found a way to put one of her family linens to good use by turning this once tea apron for the stylish hostess of the 1930s, '40s and '50s into something truly special for today's little girl. 

The transformation from apron to pinafore takes mere minutes. Silk satin ribbon, Swiss entredeux and French edging lace are joined to create a simple yet elegant band to stitch to the apron waistband and crafted into straps resulting in a special occasion pinafore. The updated vintage piece is worn here over a high-yoked dress of pink Victorian batiste featuring puffed sleeves and a touch of ruffle at the bias-bound neckline.

What you'll need:
· Vintage apron of your choosing
· 2 yards white Swiss entredeux
· 3-1/4 yds 1-inch-wide pink silk-satin ribbon
· 2 yards French edging lace
· Bias tape or a bias strip of dress fabric for arm curve
· Madeira Cotona 80wt or Mettler 60wt sewing thread
· Lightweight thread to match silk-satin ribbon
· Size 60 needle
· Blue wash-away fabric marker   

NOTE: Make underdress before making pinafore so that arm curve placement is precise. Mary used the "Heirloom Party Dress" pattern from Martha Pullen's book, French Hand Sewing by Machine II, however, there are several high yoke dress patterns available from other sources. Check your pattern stash before buying!

1. Join ribbon to entredeux in same manner as stitching entredeux to fabric. Trim and whip seam and press toward ribbon. Butt and zigzag lace edging to remaining side of entredeux.

2. If waistband of apron is wider than ribbon band, fold apron band in half and straight stitch.

3. Measure waistband of apron and cut a piece of ribbon band to this measurement plus 1 inch. Reserve remaining strip for shoulder straps.

4. Pin ribbon-lace band over waistband of apron aligning top edges first, turning under each end 1/2 inch to finish even with back edges of apron. Stitch in the ditch of the entredeux and topstitch each end. DO NOT stitch top edge of ribbon at this time (fig. 1). This must remain open to accommodate straps later.


Figure 1

5. To mark arm curves, align center front of apron to center front of dress, placing top edge of apron 1/4 inch above yoke seam line of dress. Mark side seams of dress and bottom of underarm seam on apron using a wash-away marker (fig. 2). 


Figure 2

6. Using the arm-curve guide of your dress pattern, align guide to side seam marks on apron. Place front of guide to front of dress and align curve of guide to bottom mark on apron (fig. 3). Trace curve with a wash-away marker.


Figure 3

7. Stay-stitch inside 1/4-inch traced curve and cut out curve on marked line (fig. 4).


Figure 4

8. Finish curve with bias binding from dress fabric or purchased bias tape to match, tucking raw end under at each end.

9. Pin apron to front of dress and tie sashes in back. Custom fit straps from front to back. Pin straps to apron and remove apron from dress.

10. Sew front end of strap between ribbon and original apron waistband at a slight angle. Topstitch across top edge of ribbon waistband (fig. 5).


Figure 5

11. Fold back strap ends under and topstitch to right side of apron in back just above entredeux (fig. 6).


Figure 6

For more special occasion dress inspiration, check out the new book Perfect Party Dresses. Featuring renowned designers such as Gail Doane, Julie Graue and Susan O'Connor, this book includes easy-to-follow instructions for 12 smocked dresses and three petticoats! You'll also learn how to tie a perfect sash bow, discover helpful tips for finishing touches and find out how to care for smocked and embroidered garments.

Sew On, Sew Well, Sew Beautiful,
Cyndi and Amelia

Wednesday, May 29, 2013

Serge With Confidence: Part 5

May Book Blog: Serge With Confidence by Nancy Zieman
Our last and final blog on our little serged baby set is a relatively easy lesson, since you have already cut out and serger shadow stitched your bonnet piece using the cover stitch. If you haven’t already cut out a batiste lining piece, do so now using your embellished organza top layer. Secure the layers together, wrong side of organza to right side of batiste, using pins or KK 2000. Serge with an overlock across the bottom and then around the curved edge.

Turn up the bottom hem to the wrong side so that the serged edge just overlaps the lower edge of the shadow stitching(you should be able to see it through the fabric).

Press and take to the sewing machine. Topstitch on the right side just beside the  shadow stitch line in thread color that matches your project. The stitching will catch the hem on the wrong side.

Now since your bonnet piece is curved all the way around, you will need to ease in the hem. Run two gathering threads at least 4.5 inches long 5/8 inch and 1/4 inch from the curved edge.

Pull the threads around the curve gathering slightly so you can fold the edge under to slightly overlap the shadow stitching line.


Press. Straight stitch from the front around the outer edge, just as you did across the hem edge. This will create your casing. (You will have some gathering on the wrong side of the fabric, but since the bonnet is drawn up with a ribbon, this is fine.)


Run a ribbon through the casing using a safety pin.

Pull up the bonnet to fit. To secure the bonnet shape, stitch through all layers (including ribbon) at the edge of  shadow stitching beyond the casing opening.

Tie knots in the end of each ribbon.


Gift a new baby girl with this sweet little serger set.


-Amelia

Friday, May 24, 2013

Serge With Confidence: Part 4

May Book Blog: Serge With Confidence by Nancy Zieman
Now that our decorative work is done on all our organza pieces, it’s time to construct our little jacket. For the most part, I followed the construction process given in the pattern, with these exceptions:

First, place each organza piece to each batiste piece, wrong side of organza to right side of batiste, and baste around the edges to join.


Treat as one from this point on.

Change your serger setup to a three- or four-thread overlock stitch and finish the jacket edges along the front facings. Fold the facings to the right side of the garment along the foldline and stitch across the facings 3/4 inch from the top just to the end of the serged finish and 1-1/2 inches from the bottom across the facing. 

Mark all the way around your neckline edge 1 inch from the shadow-stitching line.


Serger finish around the neck on the marked line (with the facings still turned back).


Stitch up your side seams making sure to align the shadow stitching.


Finish with the serged edge. (You could serge only, but you run the risk of misaligning the shadow stitching). 

Serge all the way around the bottom edge of the jacket (facings are still turned back.)

For many serged baby items, you could serger finish the neckline and simply fold back the narrow edge and topstitch to finish. For this design, however, I needed the turned-back edge to meet the shadow stitching, and to fold back a wider finish along a curve requires you to clip the curves into the finished, serged edge. You could do this, however it leaves raw fabric along the clips and isn’t a very attractive finish.


Instead I suggest finishing with a bias strip from the batiste. Cut the strip 1-3/4 inches wide. Fold it in half and press in a circle shape echoing the shape of the your neckline. With the raw edges of the bias aligned with the raw edges of the jacket and working on the right side of the jacket, sew around the neckline with a 1/4-inch seam. Trim the ends of the bias so they overlap the turned-back facing approximately 1 inch. Clip the curves, turn the bias binding to the wrong side, turn the facings to the inside of the jacket (this will also flip the bottom hem up as well) and press around the neck, the hem and down the facings. The bottom hem should meet or be positioned slightly beyond the bottom shadow stitching.


To secure you could hand blind stitch, but it is just as clean and easier to topstitch so that your topstitching lies right beside the shadow stitching line. Use thread to match the garment fabric on the shadow stitching (in this case a fine cream thread). The stitching is barely detectable and you catch the hem on the underside.


The neck bias aligns just beyond the edge of the shadow stitching as well, and you will secure it in the same manner.


Serger finish your sleeve edges, turn up the hem to the shadow-stitching line, press and topstitch as for the jacket. Stitch the sleeve seams aligning the shadow stitching and finish the seam allowance with a serger.


Gather the sleeve cap and set into the garment, finishing with a serged edge. This is a small area to work in, so stitch slowly and carefully.

Add a ribbon closure as instructed in the pattern.


Apply a clear snap on the underlap to secure.

Next week, we will tackle our little drafted bonnet to complete the set.

And on a side note, I actually chatted with Nancy Zieman at Quilt Market in Portland; she was signing copies of her Sew Knits with Confidence book at the F+W booth. And she assured me that my suggesting you catch a skipped stitch with a needle and thread was perfectly acceptable. So we can all relax and forgive our little sewing flaws. 

-Amelia

Thursday, May 23, 2013

Sew a Swirl-of-Ruffles Hem Treatment!


Swirl-of-Ruffles Hem Treatment

Several years ago, designer and Sew Beautiful contributor Khristal Joett showed us a crumpled instruction sheet for a vintage pattern that she purchased at an estate sale. What interested Khristal the most about the garment was its unique swirl-of-ruffles hem treatment, which was ironically similar to the hem on an antique dress we had recently acquired to share on an episode of "Martha's Sewing Room." Using the vintage pattern, we created two different dresses for a feature in our March/April 2011 issue - one version was a fun, modern reproduction, while the other was more heirloom-inspired.

Today, we'd like to show you how to achieve the swirl-of-ruffles hem on any garment. As you plan your project, consider cutting bias strips for ruffles (so they don't fray) and allowing the raw edges to be exposed. Instead of using fabric, you could also create the swirls with decorative trims, fringes or ribbons. Spruce up your favorite skirt pattern or purchased skirt with ruffled swirls, or add a dressy finish to a special occasion dress in silk dupioni. Be creative with this vintage-inspired trim!

Making the ruffles:
NOTE: Before gathering, decide how to finish ruffles (bias raw edges, narrow hem, zigzag rolled edge, machine scallop stitch, decorative stitch, serger edge, etc.)

1. Cut several bias strips 2-1/4-inches wide (for a 1-inch finished ruffle) and one half to twice the length of swirl depending on how tight you want to gather your ruffles. Fold and press each side edge to wrong side of fabric 5/8 inches so that they overlap 1/4 inch down the center (fig. 1). 


Figure 1

2. With thread to match fabric, gather along center using a traditional straight stitch (L=4.0) for pulling, or with a ruffling foot attachment. Adjust gathers as pictured on swirl template.

3. Press corners under at one end and stitch to secure a pointed finish (fig. 2). You can also turn and hem edge straight across. Complete all ruffles and set aside for application.


Figure 2

Attaching the ruffles:
Side seams of skirt or dress must be sewn and finished before adding ruffles, as ruffles are sewn on top of seam on right side. This can be done after dress is fully constructed or before you add a skirt to a yoke or bodice.

1. Mark a 1-inch hem at skirt bottom. 

2. Divide front into four equal sections between side seams; draw three vertical lines from hem. Trace curves in each corner of marked lines and side seams, as pictured on swirl template. TIP: Get creative and add curls at each tip or make longer ruffles that serpentine to the top.


Swirl template

3. Do not stitch hem until after all ruffles are applied. Work from right to left so that each added ruffle covers raw end of previous one. Begin pinning or glue-basting ruffles so that gathering stitch is on curved line and 1/2 inch above hemline. Be sure the straight end overlaps the next swirl guide line just a little, so that it is caught in the stitching of the next ruffle. Straight stitch ruffles to skirt on top of gathering stitch line. 

4. Press hem up 1/2 inch then again 1/2 inch and hand blindstitch on inside of dress (stitching should be hidden by ruffle).

For more ruffled sewing inspiration, check out our new DVD, Marjorie's Ruffle Dress with Connie Palmer. You'll learn how to create an adorable little girl's dress and matching doll dress as Connie shares tips, tricks and magic methods for ruffles and piping!

Sew On, Sew Well, Sew Beautiful,
Cyndi and Amelia

Wednesday, May 15, 2013

Tips for Preserving Your Precious Heirlooms


One question we are asked frequently at Sew Beautiful is "How do I preserve my family heirlooms?" Properly cared for, precious clothing can survive many generations of storage, and your children's children will don a history of love when the garments are worn for the special occasions that mark their lives. In the following excerpt from our May/June 2009 issue, experts share their advice for preserving heirloom garments:

Cleaning the garment - Heirloom garment authorities, including Martha Pullen, agree the single most important concern is to put the garment away clean. All stains and chemicals should be removed, including starch, soap, bleach and fabric softener.

Stains, dirt and dust left on fabric can cause holes as the garment ages, according to Judy Ritter of Whiteworks Christening Gowns in Rome, Ohio. Mildew renders a gown useless as well, and even mild chemicals left in fabric will mildew. If you take shortcuts in the cleaning process, you may be shortchanging future generations in the end, so take great care to thoroughly clean your garments. Pullen cleans her vintage clothing and linens by soaking them in a plastic container filled with water and 1/2 cup of all-fabric nonchlorine bleach, such as BIZ. "Sometimes I leave it for two days - sometimes two weeks," she says. "Then I rinse over and over again and wash with a mild detergent such as Ivory Snow." 

Garments in excellent condition can be machine washed if they are not made with thin fabrics. Pullen recommends putting them in a mesh sweater bag and using the delicates or hand-washable cycle. "Sometimes I wash once with regular detergent and then wash again with just clear water," she notes.

When the garment has been cleaned and rinsed well, it must be dried thoroughly. Experts recommend rolling the piece gently in a towel to absorb most of the water and then laying it flat to dry. It is crucial to support the garment well as it dries, as the weight of the wet fabric may cause it to tear. Commercial laundry screens purchased at discount stores can be suspended over a bathtub to hold a drying garment. 


Storing the garment - Storing heirloom garments is a simple task as long as you follow some basic rules: store flat, if possible, with acid-free tissue paper (such as Sew Beautiful Heirloom Tissue Paper) to cushion the folds; avoid sunlight, dust, moisture and fluctuations in temperature; air occasionally, about once each year. "Fresh, circulating air keeps mold and mildew away, so will cooler temperatures," Ritter explains on her website. Plastic should never be used for storing heirlooms, she says, because plastic hinders air circulation around the natural fibers and can trap moisture.

Flat storage puts less strain on delicate fabrics and is recommended over hanging storage. "If you store on a hanger in a garment bag be sure the hanger is padded and the garment bag is cotton," Pullen cautions. "I think it is much better to store flat rather than to hang." If you are storing a piece flat and folded, place tissue-wrapped packages in a clean cotton or linen pillowcase. Cotton and linen breathe and can absorb any moisture that may be in the air. These packages may be stored in a drawer; however, acid-free boxes or fabric-covered and lined boxes can prevent crushing from the weight of other items that may be placed on top of them. They keep out bugs, light and moisture as well. If storing on a closet shelf, definitely use a storage box. For added protection, throw a few cedar balls into the box to deter any pesky moths.

These guidelines are adequate for the cleaning and preservation of heirloom garments that will continue to be handed down and occasionally worn by generations. They will not suffice, however, for museum-quality antiques, as these require special treatment by trained curators. Many commercial dry cleaners offer museum cleaning and preservation methods, which are also often used in the storage of wedding and christening gowns.

If you're now inspired to create a new family heirloom,  check out our new DVD, Yoke Dress Construction. The yoke dress is one of the most popular garments in heirloom sewing, and this DVD will show you how to construct a perfectly sewn yoke dress as children's clothing construction master Connie Palmer demonstrates the tricks of perfect piping, how to create and attach beautiful collars, sleeve variations and more. 

Sew On, Sew Well, Sew Beautiful,
Cyndi and Amelia

Friday, May 10, 2013

Serge With Confidence: Part 2

May Book Blog: Serge With Confidence by Nancy Zieman

I asked you last week to gather your materials, but two things I failed to mention were KK2000 Temporary Spray Adhesive and Roxanne’s Glue Baste-It. Since we’re working with two fabrics, the spray is handy for adhering the layers together, particularly since organza against batiste is a very slippery proposition. I personally like to lightly spray the surface of the batiste and layer the organza on top before cutting out the pieces, so they will be cut out the exact same size.


Roxanne’s glue is an option to baste stitching hems in place prior to stitching. Also, pre-wash both your fabrics before starting. And I’m thinking when we get to the cover stitching next week, I may try it with some wash-away stabilizer first since organza might need the extra support; so have that on hand. 

Another tip I should have mentioned last week before getting started is to check the availability of wooly nylon threads before you decide on your batiste color. My initial thought was to use blue, but Gutermann’s Bulky Nylon, which is available to me locally, didn’t have a shade of blue that would work. So instead, I’m using cream batiste, white organza and pink thread for the cover stitching.

Preparation:
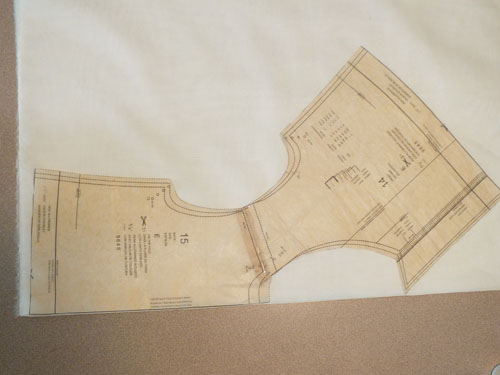
1. Before we can start with the decorative part of serging our project we have to cut out the jacket pattern, which if you’re using Burda 9645 are pieces 14, 15 and 16. I altered the pattern in two ways. First, I preferred a straight sleeve rather than the slight bell design given in the pattern, so before cutting out, I folded the sleeve pattern straight down from the underarm on both sides.


2. Second, since I didn’t want the cover stitch to be altered in appearance over the shoulder seams, I overlapped the front jacket piece and the back piece on the 5/8-inch seamline, pinned it together and cut it out as one on the fold.


I used the adhesive spray and cut both my batiste and organza layers out together, but you may prefer to cut them separately. Set all the batiste pieces aside for now.

3. The cover stitching will be done on the organza jacket layer. The trickiest part here is making sure the cover stitch will be at the same level across the bottom of both the front jacket and back jacket, so when you join the jacket at the side seams, the shadow stitching lines will match up. Measure up from the bottom of the organza jacket piece 2-1/2 inches. Take a heat or water-soluble marking pen and mark all the way across the bottom on both front and back.

4. Mark 1-1/4 inches in from the neckline all the way around the jacket opening, measuring in from the facing fold when you get to that point. Since you’re working with sheer organza, it is best to place it on top of a dark surface in order to see the edge of the fabric.


Bonnet Preparation:
For the simple bonnet, you’ll need to create a single pattern piece that looks basically like a big gumdrop.

1. Trace off a rectangle 6 inches deep by 15-1/2 inches wide. Draw a line down the center of the rectangle. Measure up 7 inches from the center and make a point. Starting at the right corner of the rectangle, draw a curve up to the center dot. Repeat for the other side.


2. Cut out an organza and a batiste bonnet piece; set the batiste piece aside.

3. To mark the organza bonnet for cover stitch, measure up from the straight lower edge 1-1/2 inches and draw a guideline across. Measure in 1 inch around the curved edge and draw a guideline completely around. 

Next week we will tackle our cover stitching on our organza overlay pieces.

-Amelia

Wednesday, May 8, 2013

Sew a Vintage Button Monogram Pillow

Button Monogram Pillow
Vintage buttons are wonderful little works of art that come in all sizes, shapes and colors. So often, however, these pretty little trinkets wind up sitting in jars in our sewing rooms and never reaching their full design potential. Incorporate vintage buttons into your home décor with this tutorial for a Button Monogram Pillow. Designed by Laurie Anderson, the pillow is actually part of a trio of vintage button throw pillows that were featured in our January/February 2009 issue. You don't need a specific pattern to make the pillow - Laurie used a basic 14-inch pillow form and made the pillow cover to fit.

What you need:
Fabric: 1/2 yard of print fabric (fabric shown on samples is "Fontanelle" by Waverly);1/2 yard of white Kona cotton

Supplies: Vintage buttons all sizes, colors and shapes; Vintage handkerchief (10- to 12-inch square); 14-inch square pillow forms; Water-soluble stabilizer; Piping cord; Wash-away fabric marker; Fabric basting glue

Thread: Thread for lace embroidery (sample uses Isacord 9904); 60wt white thread (sample uses Mettler 60wt); 80wt pink thread for pinstitching (sample uses Madeira Cotona 80wt); Quilting thread for sewing buttons in place

Needles: Universal 70 needle; Universal 120 needle for pinstitching; Hand stitching needle to sew buttons in place

How to create:
1. Cut one 14-1/2-inch fabric square (print fabric); 1-1/4-inch-wide bias strips for 60 inches of piping (print fabric); and two 11- x 14-1/2-inch rectangles for back (white fabric).

2. Center handkerchief onto print fabric square and pin or glue-baste in place. Sew discreetly in place using either a narrow zigzag stitch, a pinstitch, decorative stitch or handstitching. If the handkerchief has lace edging it can be either left loose or tacked down.

3. Use a water-soluble marker to mark letter and button placement in corners.

4. Sew buttons in place using quilting thread.

5. We'll now begin pillow construction. NOTE: Back of pillow opens like a sham with a button closure. On back piece, fold 14-1/2 inch edge under 1/2-inch then 2-inches under and stitch in place. This is center button facing.


Figure 1

6. Choose buttons for back closure, measure and mark buttonholes on one side. Stitch buttonholes and cut openings (fig. 1).


7. Overlap 2-inch hems and stitch edges together on overlapping sides. Lay top pillow onto back and square up to same measurement of front.

8. Cover 60 inches of cord with bias to make piping.

Figure 2
9. Stitch piping 1/4 inch away from outer edges on back pillow piece (fig. 2).

10. Stitch back to front with right sides together. Trim corners and turn right side out.

11. Sew buttons behind buttonholes on back closure.

For more home décor design inspiration, check out our new DVD, Home Decorating: Tricks & Techniques. You'll love learning resourceful solutions to your home décor sewing dilemmas, plus tips and tricks that will change the way you sew for your home.

Sew On, Sew Well, Sew Beautiful,
Cyndi and Amelia

Friday, May 3, 2013

May book blog: Serge along with us!


Hello again, Amelia here, back to blog about a book for May. This month I’ve picked something to challenge myself, Serge with Confidence by Nancy Zieman. This isn’t a new title. In fact many of you may have it, but it’s the perfect book, if, like I am, you’re a bit intimidated by the thought of serging anything but a seam. 

What caught my eye while flipping through the pages was the adorable little bonnet and jacket set on page 71. Nancy used the cover stitch option to basically achieve the effect of shadow embroidery. I’ve used the cover stitch function on my machine before. Some of you will remember the old-fashioned, one-piece Lycra bathing suit I made for my son Ellis featured in Sew Beautiful. But I’ve never tried to engage cover stitch for decorative purposes using fine, heirloom fabrics. 


Throughout the month, you are welcome to journey with me as I construct this set. Although Nancy doesn’t name the pattern she used in the book, I found a very similar pattern from Burda, kids #9645, for the jacket, and I will provide dimensions for the little bonnet. I’ll be using batiste, organdy and ribbon from Martha Pullen Company and embellishment instructions from Nancy’s book. So gather your materials and check back next week, as I get started.

-Amelia

Thursday, May 2, 2013

Our May/June Issue is Now Available! Plus, Read About Liberty Of London:


Our new May/June issue!
Our May/June issue just hit newsstands, and we are so excited to share this new edition with you. The cover features an adorable floral romper, which you can make for your little girl using our "Box Pleated Romper" centerfold pattern (sizes 12M to 4T). Designed by Janet Gilbert, this exclusive pattern was recreated from a vintage 1940s silhouette and uses a bright floral print from Liberty of London's new Classic Tana Lawn collection. We just love this new line from Liberty, so we thought we would take this opportunity to share a short feature on Liberty of London that first appeared in our July/August 2010 issue:

Give me Liberty!
By Amelia Johanson

The 135-year story of Liberty of London is a tale of quality, eclectic design and impeccable style. Not solely a fabric company, Liberty through the years has transacted in all sorts of decorative and artistic items at its destination store on Regent Street - clothing, ceramics, rugs, accessories, etc. But it is the company's distinctive florals and prints on magnificent cotton lawn that will forever endear the name to the sewing enthusiast. 

Historical information, accessible on the Liberty of London website and referenced in books and online, reveal that Sir Arthur Lasenby Liberty opened his first shop on Regent Street in 1875. He originally imported prints from Japan and the Far East but demand within the first decade prompted him to employ his own artisans so that he could dye and print original designs on raw imported yardage. Not long afterward, he acquired his own printing company so that the fabric production became an in-house venture. 

Recent collaborations tied to various clothing and design houses and even a discount retailer are making the Liberty of London name as familiar to Americans as it has been to Englanders for over a century. But at The Children's Corner in Nashville, Tenn., customers have been sewing fine children's apparel with Liberty Tana Lawns for nearly 30 years. 

Dresses were made using Children's Corner patterns: (top left)  #3 Betsy Bishop; (right) #36 Handsewing IV, combination of Elizabeth and Tiffany; (bottom left) #266 Macy.

"Customers love coming in to see the samples, even if some of the Liberty of London patterns are no longer available. The incredible fineness of the Tana Lawn makes it a joy to work with and the designs are simply glorious," said Lezette Thomason. We asked the Children's Corner designer and sewing instructor to send us some of her favorite "Liberties," which can be seen in the left-hand column. Her collection spans two decades and exhibits the brilliance of Liberty of London prints - they remain simultaneously fashionable and timeless.

Children's Corner pattern used above is #241 Lucy.

Visit the Martha Pullen Store to shop Liberty's new Classic Tana Lawn Collection. And for more fabulous floral inspiration, be sure to pick up your copy of our May/June issue. In addition to the free romper pattern, here are a few more highlights from the edition:

  • Turn a sundress into a summer stunner with a bold daisy appliqué (Connie Palmer) 
  • Create a fabric posy appliqué that doubles as a functional pocket (Tricia Smith)
  • Hand embroider a floral bouquet on a linen table cloth (Laura Jenkins Thomas)
  • Shape lace flowers on an organdy pinafore (Debbie Glenn)
  • Appliqué a groovy flower using spaghetti bias (Kari Mecca)
  • Plus, hand embroider grasshoppers on your little man's summer fun clothes, make a scalloped floating hem band in this issue's "Master the Method," find inspiration in Martha's Attic, take a sneak peek at our Sewing for the Royal Baby book and more!

Sew On, Sew Well, Sew Beautiful,
Cyndi and Amelia