Showing posts with label book blog tour. Show all posts

Friday, May 10, 2013

Serge With Confidence: Part 2

May Book Blog: Serge With Confidence by Nancy Zieman

I asked you last week to gather your materials, but two things I failed to mention were KK2000 Temporary Spray Adhesive and Roxanne’s Glue Baste-It. Since we’re working with two fabrics, the spray is handy for adhering the layers together, particularly since organza against batiste is a very slippery proposition. I personally like to lightly spray the surface of the batiste and layer the organza on top before cutting out the pieces, so they will be cut out the exact same size.


Roxanne’s glue is an option to baste stitching hems in place prior to stitching. Also, pre-wash both your fabrics before starting. And I’m thinking when we get to the cover stitching next week, I may try it with some wash-away stabilizer first since organza might need the extra support; so have that on hand. 

Another tip I should have mentioned last week before getting started is to check the availability of wooly nylon threads before you decide on your batiste color. My initial thought was to use blue, but Gutermann’s Bulky Nylon, which is available to me locally, didn’t have a shade of blue that would work. So instead, I’m using cream batiste, white organza and pink thread for the cover stitching.

Preparation:
1. Before we can start with the decorative part of serging our project we have to cut out the jacket pattern, which if you’re using Burda 9645 are pieces 14, 15 and 16. I altered the pattern in two ways. First, I preferred a straight sleeve rather than the slight bell design given in the pattern, so before cutting out, I folded the sleeve pattern straight down from the underarm on both sides.


2. Second, since I didn’t want the cover stitch to be altered in appearance over the shoulder seams, I overlapped the front jacket piece and the back piece on the 5/8-inch seamline, pinned it together and cut it out as one on the fold.


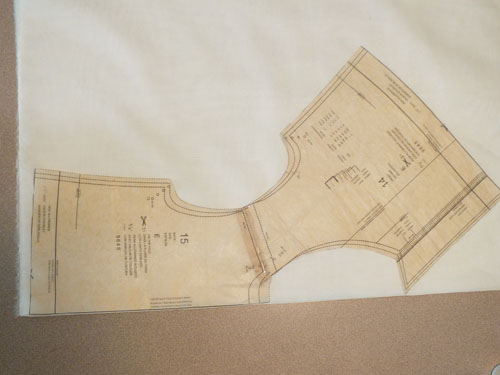
I used the adhesive spray and cut both my batiste and organza layers out together, but you may prefer to cut them separately. Set all the batiste pieces aside for now.

3. The cover stitching will be done on the organza jacket layer. The trickiest part here is making sure the cover stitch will be at the same level across the bottom of both the front jacket and back jacket, so when you join the jacket at the side seams, the shadow stitching lines will match up. Measure up from the bottom of the organza jacket piece 2-1/2 inches. Take a heat or water-soluble marking pen and mark all the way across the bottom on both front and back.

4. Mark 1-1/4 inches in from the neckline all the way around the jacket opening, measuring in from the facing fold when you get to that point. Since you’re working with sheer organza, it is best to place it on top of a dark surface in order to see the edge of the fabric.


Bonnet Preparation:
For the simple bonnet, you’ll need to create a single pattern piece that looks basically like a big gumdrop.

1. Trace off a rectangle 6 inches deep by 15-1/2 inches wide. Draw a line down the center of the rectangle. Measure up 7 inches from the center and make a point. Starting at the right corner of the rectangle, draw a curve up to the center dot. Repeat for the other side.


2. Cut out an organza and a batiste bonnet piece; set the batiste piece aside.

3. To mark the organza bonnet for cover stitch, measure up from the straight lower edge 1-1/2 inches and draw a guideline across. Measure in 1 inch around the curved edge and draw a guideline completely around. 

Next week we will tackle our cover stitching on our organza overlay pieces.

-Amelia

Friday, May 3, 2013

May book blog: Serge along with us!


Hello again, Amelia here, back to blog about a book for May. This month I’ve picked something to challenge myself, Serge with Confidence by Nancy Zieman. This isn’t a new title. In fact many of you may have it, but it’s the perfect book, if, like I am, you’re a bit intimidated by the thought of serging anything but a seam. 

What caught my eye while flipping through the pages was the adorable little bonnet and jacket set on page 71. Nancy used the cover stitch option to basically achieve the effect of shadow embroidery. I’ve used the cover stitch function on my machine before. Some of you will remember the old-fashioned, one-piece Lycra bathing suit I made for my son Ellis featured in Sew Beautiful. But I’ve never tried to engage cover stitch for decorative purposes using fine, heirloom fabrics. 


Throughout the month, you are welcome to journey with me as I construct this set. Although Nancy doesn’t name the pattern she used in the book, I found a very similar pattern from Burda, kids #9645, for the jacket, and I will provide dimensions for the little bonnet. I’ll be using batiste, organdy and ribbon from Martha Pullen Company and embellishment instructions from Nancy’s book. So gather your materials and check back next week, as I get started.

-Amelia

Thursday, February 14, 2013

New Month = New Book Blog!


For the month of February, our Senior Designer Amanda Elliott, will be taking us along on her journey of projects from the book
by 

Shufu To Seikatsu Sha. 


A quick description of the book:
25 fabulous, wearable garments from only 8 simple patterns
Sewists will learn how to make a closetful of comfortable and easy go-to garments without needing a library of separate patterns with Simple Modern Sewing. All you'll need to make 25 unique garments are the eight included basic sewing templates included. Shufu To Seikatsu Sha has designed each pattern to be easily adaptable with no-fuss sizing and clear fabric folding and cutting instructions, so it's simple to sew clothes that are perfect for you.
Beginning sewing patterns are often boring or unappealing in favor of being easy to sew. These 25 patterns are just as approachable as traditional beginning sewing patterns, but also have the still style and modernity of more complex patterns. Once you've mastered a pattern, you can combine your creativity with the template provided to design a one-of-a-kind garment with different fabrics or added embellishments like a print lining or contrast-stitching.
Sewers of all skill levels with love the freedom of making custom-cool clothes without all the fuss and hassle of traditional sewing patterns and customizations. Fill your wardrobe in no time with the easy to make and wear garments of Simple Modern Sewing.


 I was thrilled, for many reasons, when I came across Simple Modern Sewing by Shufu To Seikatsu Sha—I haven’t sewn in a long time (a real long time).  I received a new sewing machine for Christmas and was antsy to test it out and the book features several garments with ruffles. The Sew Beautiful staff is quite familiar with my affinity for ruffles—I wear them nearly everyday! For my first project from the book, I was excited to find a simple blouse with bias band ruffles, made in 7 simple steps.

After tracing off the pattern and cutting pieces, I followed the steps: join left shoulder, use bias strips for neckline and armhole binding, create bias band, gather and ruffle band, attach ruffle to neck line, finish sides and hem bottom. Viola! Blouse is complete!


I did not take many step outs while constructing this garment, but I will share some insight.


Make sure you have all supplies handy before starting. It is helpful to have things such as pins, stabilizer, hot iron, a glass of wine, instructions, seam ripper, fabric weights, etc. at an arm’s reach.

Don’t underestimate the helpfulness of space and resources. I found very quickly that sitting on the hardwood floor of my craft room, straddling pattern and fabric gets old, very quickly, especially when the dog comes in, tries to help by applying dog hair, rearranging your pattern pieces, so on and so forth. The aid of a cutting table, clear rulers and rotary cutters are a must for my back, straight cut lines and my next project. 

Iron, iron iron. It really makes a difference.

Prewound bobbins are amazing. Drop and go.


Don’t let techniques you think to be difficult intimidate you. I did not know how binding worked until working with this pattern. I finally took the time to sit down, study the pattern and figure it out. I am almost embarrassed how easy it actually is.

When working with fabrics that don’t have a obvious right and wrong side, like the linen I used for this project, it is helpful to mark the RS with a contrasting thread. It will help keep you working on the correct side when there is a lot of flipping back and forth between sides.


Things to bragging about:

I finished!
I love my machine!
It looks like a real, wearable garment!
Why, yes, I did make this blouse!

Things no one has to know:

When you may have gotten really excited about how things were going and you may have sewn an armhole binding to the incorrect side. More than once.

That you may have had some really choppy cut lines until you utilized the correct materials. (Praise to temporary spray adhesive!).

That you were intimidated by a technique.

Let's here some of your embarrassing sewing moments in comments sections below! We've all been there :) 

Stay tuned next week for some more sewing as I work on the ruffled front jacket with grosgrain ribbon!


-Amanda


Want your own copy of 
Go to our store and enter code: 
BESTBOOKS10
for a 10% discount!