
 |
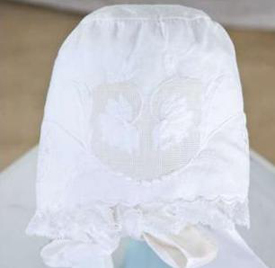
| Wendy Schoen's Punchwork Baby Bonnet |
Punchwork is both a pulled-thread stitch and a counted-thread stitch. It is an exercise in creating degrees of whitework. Surface embroidery stitches add interest with shadows and shine, while pulled thread stitches add open areas and shading.
In the how-to below, designer Wendy Schoen will show you how to stitch this elegant technique. The tutorial first appeared in our May/June 2008 issue of Sew Beautiful.
Overview of Punchwork:
Punch stitch is sometimes known as drawn fabric stitch and must not be confused with drawn-thread work, as the threads are not withdrawn. It is more quickly done than drawn-thread work and can be worked in small spaces. Punchwork is sometimes more commonly referred to as "Fil Tiré," which literally translates to "pulled thread."
A loosely woven linen should be used, as the threads are easily counted and pull together with ease. A linen thread is used in the coarser work and fine cotton on fine linen or linen lawn. When working the stitch, a tapestry needle is used so it will easily slide between the fabric threads without nipping the sides. The size of the needle is determined by the weave of the fabric. The looser the weave, the larger the needle.
The shape of the design is first outlined by the surface embroidery. This surface stitching provides a boundary or outline for the pulled thread area. Creating a boundary is critical, as it defines the edges and provides a place for tying off and traveling to the next row without the carry threads being noticed.
Once the surface embroidery is complete, the punchwork stitching fills in the fabric between the outlines. These areas are "punched" with holes, simply by pushing the thread apart at equal distances in straight lines, piercing about every third thread - the number depending on the coarseness of the fabric. There is no compensation for very thin or very thick fabric threads, as they are counted as usual. The work is done from right to left and left to right alternately. Start at the widest width inside the design area, working the first horizontal row across the entire width inside the boundary.
Tool Tips:
• I recommend a #28 tapestry, the smallest size available.
• Thread choices are critical. Only 100 percent cotton thread should be use for pulled thread. The embroidery design here is worked with Floche embroidery cotton. Shadowwork is just lovely when worked with Floche.
• I suggest at least a 70wt thread such as YLI's Heirloom Cotton Thread.
• Try applying beeswax for added stability. For working the grid, a thimble will enable you to stitch with the eye of the needle, therefore increasing your stitching speed a great deal.
• Always use one strand and the #7 between needle for the best results. Surface embroidery may be worked with a #10 sharps needle, if you prefer.
• Do not attempt this stitch without appropriate magnification.
Instructions:
The difficulty of this stitch is defined by the first row of stitches. After the first row is established, all others can be easily rendered. The hands-free hoop is invaluable, as the stitching is predetermined by the grid, and the hoop makes it is easy to stitch with the non-dominant hand. With this hoop, the grid can be worked at lightning speed.
Complete the shadowwork first, then stitch all the other embroidery stitches (surface embroidery) before beginning the pulled-thread work.
Step 1: To tie on, anchor waste knot in such a position that the thread tail can be worked over. Working over three fabric threads, sew a backstitch from A to B.
 |
| Step 1 |
Step 2: To work the next stitch, sew into A, but angle needle to emerge three threads over (A to C). Pull stitch tightly.
 |
| Step 2 |
Step 3: Continue working entire row, using sequence of A to B, A to C. Move to next row by taking a backstitch through six threads (three threads below first row) from top of first row to bottom of second row.
 |
| Step 3 |
Step 4: Begin with the A to B sequence, pulling tightly on every stitch.
 |
| Step 4 |
Step 5: To continue to next stitch, sew A to C, which is three threads over.
 |
| Step 5 |
Step 6: Complete entire grid working the same rows, each three threads down.
 |
| Step 6 |
Step 7: Rotate grid one turn so opposing rows can be stitched in the same manner. Beginning in the upper edge, stitch A to B, using the established holes.
 |
| Step 7 |
Step 8: Stitch A to C to move to next square.
 |
| Step 8 |
Step 9: Complete row and move to next row down, using the established holes for A-B points.
 |
| Step 9 |
Step 10: Completed fil tiré grid. You may tie off in the boundary area along the sides or by tying a slip-knot through two openings on back.
 |
| Step 10 |
Sew On, Sew Well, Sew Beautiful,
Kathy and Amelia
Great!
ReplyDeleteAmazing!
ReplyDeleteNice
ReplyDeletelove it
ReplyDeleteVery clear and straightforward writing
ReplyDeleteVery nice article, learned something new today.
ReplyDeleteVery inspiring and informative post.
ReplyDelete